The Quest for Smooth

smoothQuest

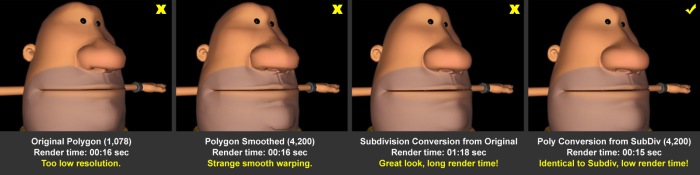
To prevent unsightly, hard edges from appearing on the final render, I need to up the resolution of my models. Because I modeled in XSI and imported into Maya, a simple “smooth” operator does not give me the desired effect. I have to convert my poly to subD and then back to poly again to get the correct smooth. Sounds redundant, but here’s a look why.

smoothQuest-explain

Blendshapes

moreMorphs

I wish I had a complex facial muscle rig that I could just animate to my heart’s content, but since I don’t – I have to tediously model each and every morph shape. I discarded all my previous versions because I actually have a new hi-rez topology (and those past shapes were pretty half-donkey’d).

Morph Targets

blendShapesMore

I just finished modelling out 30 some targets for Bruce’s mouthtargets alone. I’m sure I’ll be making plenty more specific to the shots – but for now, I need a break from modelling!

Bruce’s Bryce Part II

sceneModel

I, for one, could never be an environmental modeller. Don’t get me wrong, I appreciate and respect the artform – but it is in no way for me. I’m already not a big fan of modelling, but to model rocks and terrain… ugh. In any case, here’s a progress check on Bruce’s Bryce Canyon.

Box Modeling

sceneBlock

I started blocking out the general shapes of the mountains so I can get a good idea of scale and how things will frame up in the final picture. So far, so good – now it’s time to start detailing things

The New Model

bruceModel

Unveiling… the new and improved BRUCE v2.0! turntable (DIVX 252Kb) There are a couple things to note – the arms are dramatically shorter (he won’t be dragging his arms anymore) – and things are modelled so that as many portions of his body are separate objects as possible. For instance, in the old version, Bruce’s hands + arms + head were all one mesh. Not here! With a rock bracelet in place and a conveniently placed robe, his hands are completely separate from his arms, and his head is one separate object. Rigging will be much easier 🙂

First Model!

modelDraft1

He’s got a long ways to go, but I feel like this is a pretty good start in translating 2D Mr. Caveman into 3D. His arms are really long, but I plan on having them drag as he walks. As I develop my script and his character, I’m going to do a lot of rig tests to see what range of motion I’m able to give him – so, his arms may get longer, they may get shorter.. sit tight and we’ll see how he evolves.

Modeling Begins

initialModelling

So here goes with modeling! I’m by no means a good modeler, so my hesitance sometimes makes this is a slow process. I’m using Softimage XSI at this point because it’s faster for me. I started off by taking my drawing and making a front/side/back panel so I can draw in 3d from it. I drew simple NURBs curves and lofted them to get a good sense of Mr. Caveman’s overall volume. From there, I converted my NURBs surface into a polygonal model, and started splitting and moving points around. Although this is a simple model, I want good topology, so – I’m taking my time to make the right cuts. After I’m all done, I mirror my guy over and – voila! Here’s my rough draft model!!